
Welcome
Discover
Dashboard
Reports
Manage People
Manage Data
Videos
Date Selector
What is the Date Range window and what does it do?
On each page of the Dashboard, below the Navigation tab is a window with two dates. This window is the Date Range window and shows the time period for which data is being analysed.

If the first date is set for Mon Jan 1, 2013 and the second for Fri Apr 23, 2013, then ALL the different pages will provide information for these four months. You may have started collecting data on Wed Jun 1, 2012, but the system will ONLY analyse data based on the dates in the Date Range window.
How can I change the date range?
If you click on the Date Range window, a box will open that lets you make changes to the starting date and ending date for the period you want to view.
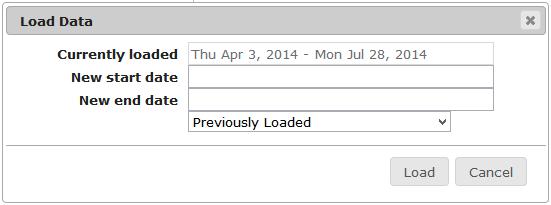
Click on the “New start date” entry box and use the calendar to enter your start date. Then click on the “New end date” and enter the end date. Once the new start/end dates are selected, hit the “Load” button and the Realize Language™ system will only analyse data between those two dates.
How can I compare different date ranges?
During a session using the Realize Language site, whenever you set a new date range, that range is stored temporarily. Click on the Date Range window to open the date range box. A drop-down option will appear that will display all the date ranges used during the session.
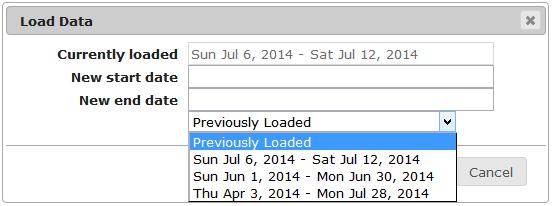
You can then switch between these and, more usefully, print out any screens from the different widgets to make visual comparisons.
I got a yellow box on my screen saying “You have reached the limit of data that can be loaded into the Dashboard at one time. Shorten the date range to ensure that all data gets loaded.” What does this mean and what can I do?
The current version of the Realize Language software has a limit of 80,000 lines of log data that can be handled. For most people, that's far more lines of data than they would reach. If you exceed that limit, shorten your date range by clicking on the Date Range window and setting new start and end dates in the Date Range box.
Realize Language / Liberator Home Contact Us Trademarks Refund Policy Privacy / Liberator Ltd, Glenside Business Park, West Pinchbeck, Spalding, Lincolnshire, United Kingdom, PE11 3SA / +44 (0)1733 370470. ©Liberator Ltd 2016
Online communication and language assessment tools for children and adults with speech disabilities who use Augmentative and Alternative Communication (AAC) speech devices / Designed for parents of children with speech disabilities, teachers of special needs students, and speech and language therapists (SLTs) / Monitors the use of AAC devices, supports language development with AAC and supports AAC in education.